Category Archives: other goodies

Corn Stew with Bagel Croutons

I did two things that I’m very proud of last week. Really, I’m sure I did more but these two graced my kitchen in one night and were particularly memorable. First, I found an inventive way to use the last of the leftover bagels from my brief stint as a bagel-baker. They had been in the freezer for weeks and Lee had declared them inedible.

Second, I made something in a pot that didn’t turn into chili, as do so many of my would-be soups and stews. This stew spawned from necessity and boredom. I was bored with making the same old things night after night and my dad was coming over for dinner so I wanted to serve him something somewhat special. Still, that special dish needed to be easy and use ingredients I had on hand, since I was getting ready to go out of town. It’s a good thing there were 4 ears of fresh corn in the fridge! I wasn’t about to let those go to waste.

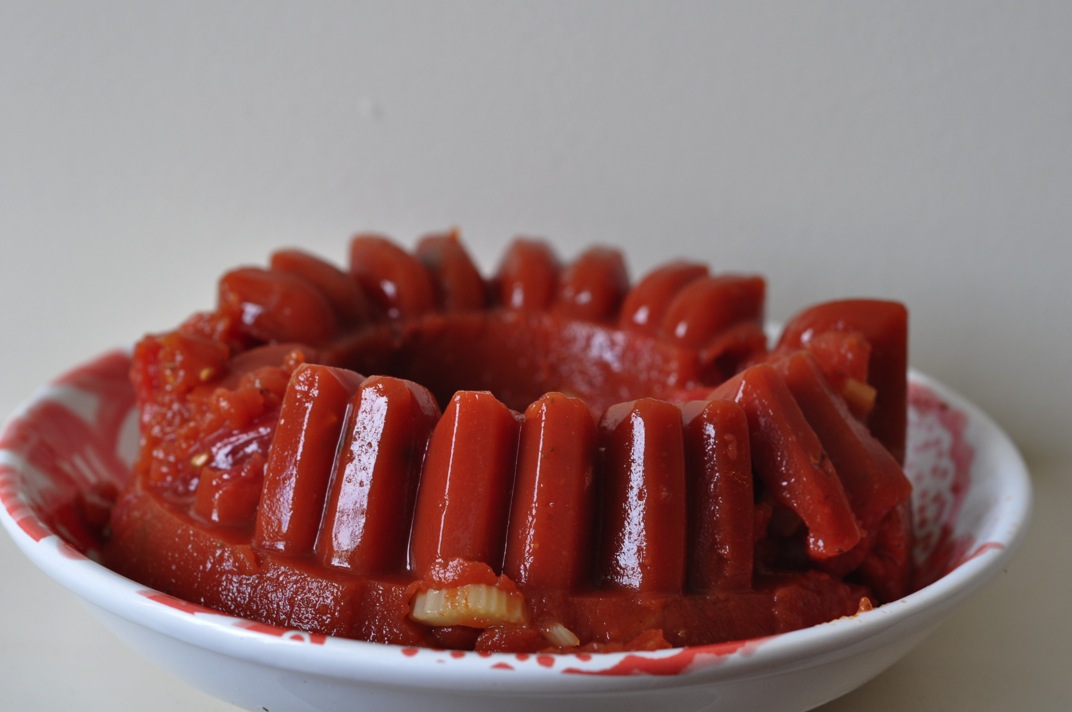
The stew came out thick (thanks to the pumpkin) and chunky (thanks to the corn and squash). I loved the bright red tomatoes against the yellow corn. My dad, Lee, and I really enjoyed it as an early fall dinner that captured some of the sweetness of end-of-summer corn. The bagel croutons were perfect and unique. Unlike regular croutons, they have quite a crust on them, which returns to it’s chewy bagel state when soaked in hot stew for a few minutes. The result was an almost meaty texture that stopped my spoon from gobbling the stew too quickly.

wpid-DSC_0635-2011-09-20-10-49.jpg

Corn Stew

4 ears fresh, sweet corn, husked
1 medium-sized brown onion, chopped
3 cloves garlic, minced
1-2 tablespoons olive oil
1 tablespoon each fresh chives, marjoram, and thyme, finely chopped (adjust to taste)
1 cup canned pumpkin puree
5-6 medium-sized pattypan squash, cut into 1 inch pieces
1 cup frozen, shelled edamame
4 Roma tomatoes, roasted (see below)
4 cups vegetable broth
1/2 teaspoon allspice
1 teaspoon chili powder
Freshly ground black pepper and salt, to taste
1 small avocado, sliced

To roast the tomatoes:
Preheat the oven to 375 degrees F.
Cut tomatoes in half and place them, skin side down, on a lightly-oiled baking sheet. I suggest lining the pan with aluminum foil, as the tomatoes tend to be rather messy.
Bake in the oven for 45 minutes to 1 hour, or until the tomatoes are shriveled and juicy.
Remove from oven and set aside to cool.
When cool, cut each half into two or 3 pieces and set aside. You will add them near the end of cooking the stew.

For the stew:
Cut corn off cobs, gathering it on a cutting board or in a bowl.
Meanwhile, preheat a large saucepan or pot. Add olive oil to coat the bottom of the pan.
Add onions and garlic, cooking until the onion is soft and translucent.
Add corn and continue to cook, partially covered for about 5 minutes, stirring occasionally.
Add herbs, allspice, chili powder, salt, and pepper. Cook about two minutes.
Add broth and pumpkin puree and pattypan squash, stirring well to blend everything together.
Reduce heat to simmer and cook for 10-15 minutes.
Add edamame and roasted tomatoes and cook for 5 minutes, or until edamame are heated through.
Spoon stew into bowls, top with sliced avocado, and serve with bagel croutons or crusty bread.

Bagel Croutons

Day-old (or older) bagels, chopped into 1/2 inch pieces
olive oil
Your preferred spices, or none at all: garlic powder, black pepper, salt, etc.

Preheat oven to 375 degrees F.
Place bagel pieces on a lightly oiled baking sheet.
Use an oil mister to spray pieces with olive oil.
Sprinkle spices, if using over bagel pieces.
(Alternatively, place bagel pieces in a plastic bag. Sprinkle a little olive oil on top, close the bag, and shake it to distribute the oil. Then re-open the bag, add spices, close and shake again.)

Place baking sheet in oven and bake for 10-15 minutes, or until bagel pieces are crisp but not burned. They will continue to crisp-up as they cool.
Allow them to cool on the baking sheet. Store in a sealed container or use immediately on stew.

4 Comments

Filed under other goodies

Chez Panisse Calzone (Recipe File Project #3)

wpid-DSC_0576-2011-09-13-11-16.jpg

My new special celebration dinner: I just found out that I got an internship at a museum!

Lee laughed when I told him what this recipe calls for. “ Three kinds of cheese and prosciutto.” I said. I should have known he’d find that funny. You see, Lee doesn’t eat cheese and I don’t eat meat. Why did I choose to make a recipe from my grandmother’s file that calls for both?

1) I wanted to make something savory rather than sweet.
2) The calzones sounded delicious
3) How could I resist Alice Waters?
4) I thought I could easily adapt the recipe to our diets while remaining faithful to it’s flavors.

See, I’m not so crazy. I also think I succeeded in accomplishing #4, although it took some thought. I replaced most of the cheese with chopped, roasted cauliflower, adding some veggie cheese to the filling for Lee’s calzone and goat’s milk ricotta salata to mine. The cauliflower made up the bulk of the filling and it’s earthy flavor blended beautifully with all the fresh herbs called for in the original recipe. I guess you could say I replaced the prosciutto with roasted red peppers, mostly for color.

As a baker, the crust was definitely the most exciting part of this recipe for me. I resisted the temptation to mess with it, using all-purpose flour as called for rather than substituting some whole wheat pastry for some of it. The dough began with a rye flour sponge, a technique I’ve never used for pizza crust before. The dough was so, so silky and light! It was incredibly easy to worth with and crisped up beautifully around the calzone filling. Best of all, it did not tear on the chunk cauliflower as I feared it might. This could become my go-to pizza crust!

I made two calzones – or calzoni, as Water’s calls them – a slightly larger one for Lee and smaller one for myself. They were perfect for a special dinner without making us feel stuffed. I’m sure the cheese-filled originals would be outstandingly delicious and much richer.

Why did my grandmother tear this recipe out of The Denver Post’s Sunday Empire magazine? My guess is that she was drawn to the novelty of calzones and the renowned Alice Waters of Chez Panisse, a restaurant she visited in Berkeley while my dad was at school there in the 70’s. Helen liked to make new and different things and these would have been right up her ally.

I wonder if she ever made them, or if the clipping sat in her file all these years without her getting a taste of Chez Panisse Calzone?

wpid-DSC_0581-2011-09-13-11-16.jpg

Chez Panisse Calzone
from Pasta, Pizza & Calzones by Alice Waters, reprinted in The Denver Post Sunday Empire magazine

(Filling)
2 oz fresh California goat cheese, crumbled
2 oz French goat cheese, such as Bucheron or Lezay, crumbled
7 oz mozzarella, grated
2 slices prosciutto, cut about twice as thick as you would for a sandwich or salad, then into a julienne
2 tablespoons fresh, finely cut chives
2 tablespoons fresh, minced parsley
1 sprig fresh thyme, chopped
1 sprig fresh marjoram, chopped
2 small cloves garlic, minced
Coarsely ground black pepper, to taste

Blend all ingredients together in a large bowl.

(Dough)
Lukewarm water
2 teaspoons active dry yeast
1/4 cup rye flour
1 tablespoon milk
2 tablespoons olive oil
1/2 teaspoon salt
1 3/4 cups unbleached all-purpose flour

Make a sponge by mixing together 1/4 cup lukewarm water, yeast, and rye flour. Let it rise 20-30 minutes.
With a wooden spoon, mix together 1/2 cup lukewarm water, milk, olive oil, salt, and all-purpose flour. Add to sponge.
Knead dough on a floured board, adding flour to the board as needed but no more than necessary.
The dough will be light and a little sticky. A soft, light dough makes a light and very crispy crust.
Knead for 10-15 minutes to develop strength and elasticity.
Put dough in a bowl rubbed with olive oil and oil the surface of the dough to prevent a crust from forming.
Cover with a towel and put in a warm place to rise for about 1 hour, or until the dough has doubled in size.
Punch the dough down and let it rise for another 40 minutes.

Place a baking stone, if you have one, in your oven and preheat to 450 degrees F.
On a floured board, roll dough into 1 circle, about 14 inches in diameter, or divide into 2 or 3 circles for small calzoni.
Have the filling ready, at room temperature, and work quickly putting it on half of the dough circle(s).
Moisten the edges with water and fold dough over filling. Fold the dough at the end up onto itself, pinching it together.
Transfer calzones to a heavily floured pizza peel, the back of a baking sheet, or a sheet or parchment paper.
Slide calzones quickly into a preheated, 450 degree oven with a baking stone on a rack close to the bottom.
Bake 15-18 minutes or until brown and crisp.
Remove from oven, brush calzone tops with olive oil, and serve.

My notes and changes: Instead of most of the cheese, I used 1 medium-sized head of cauliflower, roasted at 400 degrees for about half an hour, and then chopped. The soft goat’s milk ricotta salata I used in addition was just what I had on hand and it was delicious! (1/4 cup or so for my calzone) I was able to cut down on the rising times for the dough since I was running short on time. I gave the first rise about 45 minutes and the second 20-30 and it worked fine. You can use a parchment-lined baking sheet if you don’t have a baking stone! (But get a baking stone, it really helps and there are inexpensive ones out there that work fine.)

4 Comments

Filed under other goodies

Here a donut, there a donut, wait, isn’t that a muffin?

wpid-DSC_0414-2011-09-6-11-39.jpg

Among the many kitchen goodies I acquired thanks to our wedding gift card bounty was a mini doughnut pan. I’d seen the baked doughnut hype all over the blogosphere and I wasn’t about to miss out on the fun! You don’t need a doughnut pan to bake versions of these traditionally fried goodies. There are plenty of yeast-raised recipes out there that call for cutting out doughnut shapes and baking them on a cookie sheet. That variation is next on my list of doughnuts to make!

I opted for a mini doughnut pan because I was afraid full-sized doughnuts would just be too much. If you must know, I haven’t eaten a doughnut in…years, and the thought of one, even a baked one, kind of sends me over the edge. I figured that mini doughnuts would be slightly less scary and allow for easier portion control. Plus, their cute!

wpid-DSC_0417-2011-09-6-11-39.jpg

I perused many doughnut recipes to christen my pan but in the end the one on the package seemed like a logical starting place. I’d start simple. The batter game together easily and none of the ingredients were that extreme (a tiny amount of butter and reasonable amount of sugar). I used whole wheat pastry flour and it worked beautifully. I also ditched the vanilla glaze called for on the package in favor of simple cinnamon and sugar, which was by far my favorite doughnut topping back in the day.

Batter mixed, pan oiled, oven pre-heated – I was ready! Wait, how am I supposed to get the batter into these tiny doughnut molds?

I spooned in batter a tiny bit at a time, quickly discovering that getting the stuff in there was a time consuming task if I didn’t want to just glop batter over what was supposed to form the hole in my doughnuts. Along the way, I also realized that I was totally overfilling the molds. Oh well, I thought, we’ll just see what happens.

What do you think happened? I made mini muffins with holes in the bottom! Yay! They were certainly cute, especially with cinnamon sugar on top, but they were certainly not doughnuts.

wpid-DSC_0419-2011-09-6-11-39.jpg

Okay, mini doughnuts, take two: I had a little less than half the batter left so I scaled back on my mold filling. This time it looked like a more reasonable amount. I also tried dusting the tops of a couple doughnuts with cinnamon sugar before baking.

The result? Donuts! When removed the doughnuts from the pan they were still a little over-puffed and fat on top (what I made the bottom) but I dredged them in topping and sampled some. I give the doughnut taste and texture an 8 out of 10. The nutmeg, the spongy cake, the spic, sweet topping – it’s all there. While my doughnuts may be a little asymmetrical, they are hard to resist!

Based on my mixed experience with my mini doughnut pan I have this advice:

  1. Buy a regular sized doughnut pan unless you really, really want tiny, tiny doughnuts for some reason.
  2. If you insist on going small, get two mini doughnut pans. Then you can make a full recipe (this recipe was supposed to make 24 doughnuts) without having to refill the same pan.
  3. Consider using a pastry bag to squeeze your batter into the doughnut molds. This would really, really help but I don’t have one.
  4. Do not over-fill your molds! They really only need about 1 to 1.5 teaspoons to end up the proper shape.
  5. This recipe says it makes 24 doughnuts but really it would make 24 mini muffins with doughnut bottoms. Consider halving the recipe if you only have one pan.
  6. If you spray the doughnut molds with oil (which you should), then the part that was in the mold will stick to sugar toppings without additional butter dredging, as is often called for.
  7. Make doughnuts, whatever shape they are and however you make them. They are GOOD!

wpid-DSC_0424-2011-09-6-11-39.jpg

Baked Mini Cake Doughnuts (From Wilton Mini Doughnut Pan)
Makes 24 mini doughnuts

1 1/4 cups cake flour, sifted
1/2 cup granulated sugar
1 1/4 teaspoon baking powder
1/8 teaspoon ground nutmeg
3/4 teaspoon salt
1/2 cup buttermilk
1 egg, lightly beaten
1 1/2 tablespoons butter, melted

Preheat oven to 425 degrees F.
Spray Mini Doughnut pan with nonstick cooking spray

In a large mixing bowl, sift together flour, sugar, baking powder, nutmeg, and salt.
Add buttermilk, egg, and butter.
Stir until just combined.
Fill each doughnut cup approximately half full.

Bake 4-6 minutes, of until the tops of the doughnuts spring back when touched.
Let cool in pan 4-5 minutes before removing.
Finish with topping of your choice (glaze + sprinkles or cinnamon sugar, or something else!). You may need to brush a little butter on your doughnuts to get sugar to stick.

I didn’t use this glaze but here’s the recipe in case you want to try it.

Vanilla Glaze ( also from Wilton Mini Doughnut Package)

1 cup confectioners sugar
1 tablespoon milk
1/2 teaspoon vanilla extract

Stir all ingredients together until sugar is completely dissolved.
Use immediately to glaze doughnuts.

5 Comments

Filed under other goodies

A is for Aspic

        I know that lovely copper ring looks a lot like a Bundt pan but if you saw it in person, size would rule that out.

wpid-DSC_0060-2011-08-11-14-29.jpg

        I first saw this odd pan on a visit to grandmother Helen’s shortly after I moved to Denver, the city neighboring Helen’s long-time home. She was living in the local PEO house along with a handful of other elderly characters (I always joked that they should start a detective agency or something). I remember her ushering me into her minimal kitchen and pulling out this pan/mold thing in excitement.
“This is an aspic mold. Do you know what aspic is?” she said.
Of course I didn’t know what it was.
I don’t remember how she described it but she immediately pulled a newspaper clipped out of a pile and presented me with a recipe for Tomato Aspic.
“I think you’d really like this.” She said. “It’s just so fresh and nice and has all these lovely crunchy vegetables in it.”

We talked about tomato aspic for a while. Oh how I wish I’d had a tape recorder with me!

After she died I thought about aspic a lot. It came to symbolize the last months of my relationship with me grandmother. I always thought it was odd that she’d shown me the mold and the recipe but had not given them to me. Maybe she knew they’d be mine soon anyway. Maybe it was some kind of a test to see if I could connect the two items later when they turned up among her possessions.

I could have cried when I pulled the tarnished copper mold out of a cardboard box at my dad’s house earlier this summer. It was here! I hadn’t imagined the whole tomato aspic conversation! If only I could find the recipe she’d shown me…but it was there too! I recognized the yellowed newsprint as soon as I saw it. At that point I knew what Helen wanted. She wanted me to make tomato aspic, to try something new a different, and to think of her.

wpid-DSC_0086-2011-08-11-14-29.jpg
Unfortunately, I had kind of a hard time getting my aspic out of the mold. Any advice for a molded salad newbie?..But look how red and beautiful it is!

Tomato Aspic
From Menu Planner Cookbook by Miriam B. Loo (reprinted in an unknown newspaper)

“The fresh taste of tomato comes through in this deep red aspic.”

2 tablespoons unflavored gelatin
1/2 cup cool chicken broth (your own or canned)
4 cups tomato juice
1/2 cup chopped celery
1/4 cup chopped scallions
2 tablespoons Worcestershire sauce
1 teaspoon celery seed
1 teaspoon salt
1/2 teaspoon sugar
Freshly ground white pepper to taste
3 tomatoes, peeled, seeded, and cut into fine strips (I used 3 different small heirloom tomatoes and the colors were beautiful!)

In a small bowl, sprinkle gelatin over chicken broth and soften for 10 minutes.
Combine tomato juice, celery, scallions, Worcestershire sauce, celery seed, salt, sugar, and white pepper in a saucepan.
Simmer for 5 minutes.
Add softened gelatin and stir until dissolved.
Set saucepan in cold water and stir until mixture is cool (I put a few inches of water in the sink).
Fold in tomatoes.
Rinse a decorative 2 qt ring mold with cold water, pour in tomato mixture.
Chill in the fridge for at least 4 hours or overnight.
Unmold and serve on lettuce leaves with the following dressing.

Dill-Mayonnaise Dressing (I didn’t make this dressing. I used Annie’s ranch dressing instead.)

1/2 cup real mayonnaise
1 tablespoon fresh lemon juice
2 tablespoons sour cream
1/2 teaspoon dried dill weed.

Blend all ingredients well ad let stand for an hour to develop flavors.

What did Lee and I think of the aspic? Well, it was different that’s for sure. My mold was too small for the whole recipe so poured the rest into two small bowls and we ate that with grilled cheese sandwiches for dinner (it was like tomato soup and grilled cheese!). I served the aspic over a green salad with ranch dressing and it was a great combination of flavors and textures. The aspic was much more intensely tomato-y than I expected it to be. It was a little too intense for Lee. He made me promise only to serve tomato aspic in very small quantities in the future.

I will be making this again. Maybe for a potluck because it’s just so strange and retro.

3 Comments

Filed under other goodies