Tag Archives: nuts

Chocolate trail mix muffins

I don’t know what I’d do without snacks. Granola bars, fruit, string cheese, and handfuls of nuts sustain me between meals. There’s nothing wrong with having a snack, as far as I’m concerned, and in a lot of cases it’s absolutely necessary to keep body and brain going!

My morning snacks are usually some kind of granola bar, lately these, a handful of trail mix, or various more complicated things if I’m at home. It’s protein and healthy fat that keeps me going through the rest of the morning.

After weeks of packing the same snacks for all my work days I finally got sick of them last week. Not only was I bored with what I was eating, but I was also tired of spending money on pre-made snacks. The solution: make muffins!

Last weekend was a relatively quiet one – perfect for baking. Lee was invited to race on a boat on Saturday and had to work all day Sunday (ah, startups). I stayed home and relaxed with the dog. That was probably our last weekend at home for a while so I soaked up the leisure time while I could. I thought about projects that need doing but didn’t really accomplish much. Finally planting our backyard herb garden still had me feeling accomplished from the weekend before.

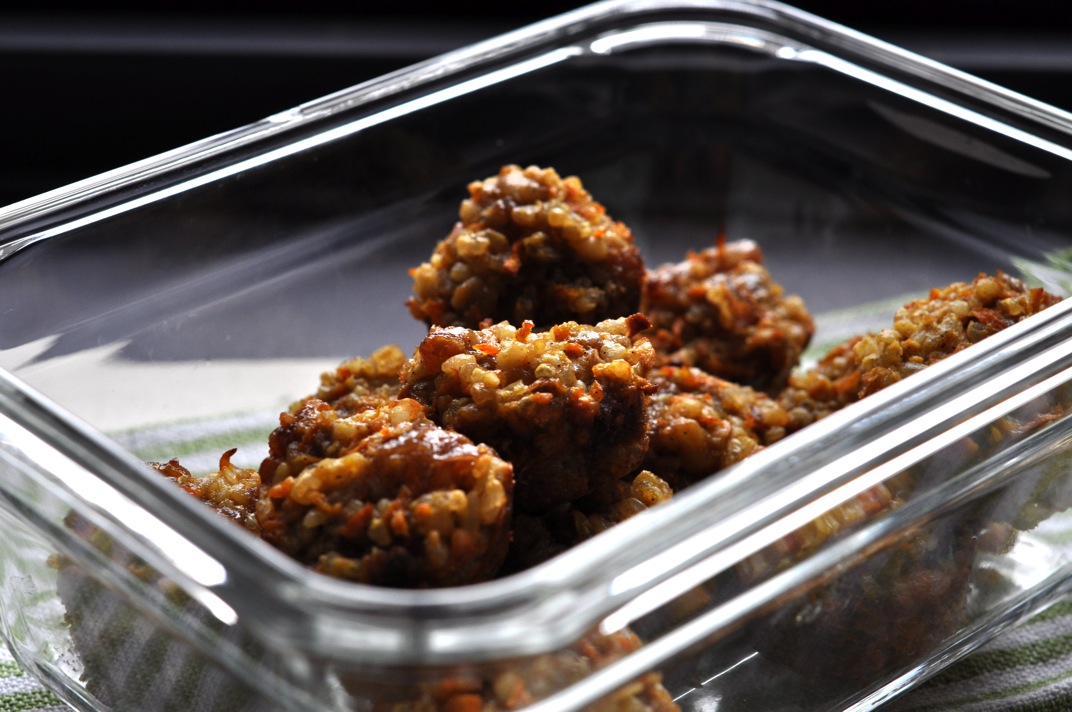
On Sunday I pulled various ingredients out of my ugly pantry cupboards (I swear I’m going to rip those things out one of these days. That’s one of those projects…). I made something new that I hoped would meet my morning snack needs for the coming week. With trail mix as my inspiration and chocolate as my canvas, I chopped, stirred, and sprinkled my way to chocolate trail mix muffins.

Chocolate Trail Mix Muffins

Prep Time: 10 minutes

Cook Time: PT15-18M

Yield: 12 muffins

Ingredients

  • 1/2 cup whole wheat pastry flour
  • 1/2 cup spelt flour
  • 1/4 cup hemp protein powder (or your preferred protein powder, or another 1/4 cup flour)
  • 1/4 cup unsweetened cocoa powder
  • 1 teaspoon baking powder
  • 1 teaspoon baking soda
  • 1/2 teaspoon salt
  • 1 cup buttermilk
  • 1/2 cup coconut oil
  • 1 egg
  • 1/2 cup coconut sugar
  • 1 teaspoon almond extract
  • 1/4 cup almonds, roughly chopped
  • 6 prunes, chopped
  • 1/4 cup sunflower seeds
  • 1-2 tablespoons unsweetened shredded coconut

Instructions

  1. Preheat oven to 375 degrees F.
  2. If your coconut oil is solid, measure 1/4 cup into a small oven-proof dish and place in the oven to liquify while the oven preheats.
  3. In a large bowl, combine flours, protein powder, baking soda, baking powder, salt, and cocoa powder, stirring with a whisk or fork until ingredients are completely combined
  4. Separately, lightly beat the egg in a medium-sized bowl. Then add the buttermilk, sugar, and oil (you may want to allow the oil to cool for a couple of minutes after taking it out of the oven).
  5. Thoroughly blend wet ingredients before stirring in almond extract.
  6. Add wet ingredients to dry and stir gently until barely combined.
  7. Add almonds, sunflower seeds, and prunes and fold into batter, being careful not to over stir.
  8. Spoon batter into a prepared muffin tin (lined with paper or silicon muffin cups or coated with oil).
  9. Sprinkle the muffin tops with shredded coconut.
  10. Bake at 375 for 15-18 minutes or until muffins are firm and the coconut has just begun to brown.
  11. Remove muffins from oven and cool on a wire rack.
http://blog.muffinegg.com/2012/05/22/chocolate-trail-mix-muffins/

2 Comments

Filed under muffins, Uncategorized

Toll Houses

wpid-DSC_0253-2011-12-4-15-54.jpg

This month’s Recipe Swap recipe made me smile. It also appealed to my nerdyness with a little geographical and historical context lesson. Christianna at Burwell General Store decided to start the swaps second year with a new cookbook. A group of brave bloggers received this vintage recipe from a very unique cookbook:

wpid-recipeswap_ford_bookcover-2011-12-4-15-54.jpg

wpid-recipeswap_tollhouse-2011-12-4-15-54.jpg

        I didn’t do a ton of baking as a kid but I do remember making Toll House chocolate chip cookies with my mom. I know they were Toll House because I remember reading the recipe off of the yellow bag. Though it didn’t happen often, for me cookie baking meant valuable lessons in how to use the stand mixer. It was big, heavy, more than a little scary with all those moving parts, and absolutely essential for perfect cookies.

Until very recently, I didn’t have a mixer of my own. My grandmother’s KitchenAid coming to live with me just happened to correspond with this cookie recipe swap. Creaming butter and sugar has never been so satisfying!
Oh but wait, I didn’t use butter in my Toll House cookies. There are two explanations for this:

  1. I wanted to use a “healthier” fat and just experiment with a different version of the traditional cookie.
  2. I forgot to buy butter.

I’d say the real reason is some combination of the above…but mostly number 2. Butter was on the grocery list. I meant to use it, really I did. I’m just not a big butter user so it didn’t make it into my basket. No problem. I had coconut oil! Since it’s solid at room temperature and has such a lovely flavor, I sometimes substitute coconut oil for butter in my baking. While it’s not the same as something made with butter, I think the flavor and texture of these cookies is outstanding.

wpid-DSC_0246-2011-12-4-15-54.jpg

        Now comes the part where I explain the houses. You see, my husband is such a sweet guy, he randomly buys me cookie cutters (this just started recently). Last month he added a house-shaped cutter to my small collection. That, of course, made me smile because we were about to buy our first house! We moved in a week or so ago so I’m feeling very homey and grounded nowadays. The house cookie cutter came out as my play on Toll House cookies and to share a little of my new home love with everyone.

I changed a few other things besides the shape and fat in my cookies. I used white chocolate chips in place of regular, vanilla bean instead of vanilla extract, and whole wheat pastry flour instead of all-purpose. This recipe is small – a nice size for a cookie recipe (unless it’s Christmas and you’re trying to feed lots of people). I baked all the dough in a pyrex dish lined with parchment and then cut the houses out of the giant sheet cookie. This worked pretty well but only made 5 houses + trimmings. The house cookies are big. I’d share one with 1 or 2 other people. The trimmings are perfect for snacking on while you’re snapping your cookie pictures or for crumbling over ice cream…yum!

wpid-DSC_0248-2011-12-4-15-54.jpg


Toll House Houses
Adapted from The Second Ford Treasury of Favorite Recipes from Famous Eating Places

1/2 cup coconut oil
6 tablespoons brown sugar
6 tablespoons granulated sugar
1 egg, beaten
1/2 teaspoon baking soda
1/2 teaspoon hot water
1 1/8 cup flour, sifted (I used whole wheat pastry)
1/2 teaspoon salt
1/2 cup nuts, chopped (I used walnuts and pecans)
1/2 cup white chocolate morsels
1 teaspoon vanilla (I used the seeds scraped from 1 vanilla bean)
Cranberries would have been a good addition. Add some if you want! They’ll be pretty!

Preheat oven to 375 degrees F.
In the bowl of a stand mixer, cream together coconut oil and sugar.
Add egg and vanilla bean scrapings.
Dissolve baking soda in hot water and then add to batter.
Sift flour and salt together and add to mixer a little at a time until completely incorporated.
Stir in nuts and chocolate morsels.
Line a baking dish (mine is 11×7 in. but a bigger one would be better) with parchment paper.
Spread cookie dough over paper to cover the bottom of the dish. The dough will be relatively soft so this is actually pretty easy.
Bake at 375 for 15-20 minutes or until golden brown.
Remove from oven and let cool. You can lift the “cookie” out of the dish and onto a wire rack using the parchment paper.
Once the cookie is cooled, cut out house shapes in as efficient a pattern as possible.
Start looking for a giant milk moat for your houses!

16 Comments

Filed under desserts

Maple Cinnamon Rolls for a recipe swap birthday

I’m going to start referring to my recipes as “Engineer-Tested”. It’s true. I usually deliver a substantial amount of baked goods to my husband’s work. Shut in their tiny warehouse office, the engineers, designers, and whoever else is around always seem happy to eat whatever I bring them. I like to think that I’m contributing to the incredible things these super smart people do.

wpid-DSC_0109-2011-11-6-12-20.jpg

This week the engineers tested a very special recipe for me. I brought over half my celebratory Maple Cinnamon Rolls, baked in honor of the Recipe Swap’s first birthday. This may only be my second month in the swap, but a talented group of bloggers has been putting unique spins on retro recipes for a whole year! I’m so glad Christianna of Burwell General Store had the brilliant idea to start the swap last year and I hope it will keep going for years to come. I just got started!

A birthday deserves a cake, of course, so our starting recipe this month is for Maple Syrup Cake.

“Maple molasses”, aka, maple syrup (I googled it), sugar, butter, spices…why mess with a good thing? Well, I guess that’s not the point. According to the rules of the recipe swap, I had to change something. Believe me, I’ll be making this cake straight up at some point. For this post, I turned the typical birthday dessert (cake) into my family’s typical birthday breakfast (cinnamon rolls).

My mom denies this, but she used to make cinnamon rolls for my brother and I to eat on our birthday mornings. She claims it was only my brother that got cinnamon rolls and maybe she’s right. The point is, I associate cinnamon rolls with birthdays, almost more so than white-iced cakes topped with plastic toys and candles. I love the smell of spice and layers of soft bread swirled with sweet, sticky cinnamon.

My mom made her birthday breakfast cinnamon rolls from the tube, which is perfectly fine with me. Last year, though, I found a cinnamon rolls recipe that I will probably make for the rest of my life. It comes from the Horn of the Moon Cookbook by Ginny Callan, which I found in a thrift store. These rolls were actually my first post in MuffinEgg, making them especially appropriate for this blog-related birthday. The bread is light and fluffy and the filling, made according to the original recipe, is not too sweet. If you’re after that really dark, sweet cinnamon swirl, there is nothing stopping you from putting a few spoonfulls of brown sugar on your dough before rolling it up.

Only three left by the time I took my pictures. They’re that good.

Of course, this time I had maple syrup cake on the brain so my favorite cinnamon rolls got a maple-y twist. There’s maple syrup in the dough and between it’s layers. In fact, maple syrup is the only sweetener in these cinnamon rolls. As an added bonus, I threw in a vanilla bean (not literally. I scraped the seeds out and threw them in). I have a huge package of vanilla beans and keep forgetting to use them. Cinnamon roll dough with vanilla beans…yum. If you have some, try it!

The original instructions suggest doubling the recipe and freezing half the cinnamon rolls before baking. I think this is a brilliant idea. I can’t really imagine a situation where you would want to make only 8 cinnamon rolls and not even put more away for a rainy day. I doubled the recipe for you here, so if you really want a small batch you can halve the ingredients or check out my first cinnamon roll post.

Maple Cinnamon Rolls
Adapted from Horn of the Moon Cookbook by Ginny Callan

Dough

1/2 cup milk (I used vanilla soy milk)
1/2 cup mashed peeled sweet potato
4 tablespoons butter
4 tablespoons maple syrup
3 teaspoons yeast
4 tablespoons warm water
2 eggs
1 teaspoon salt
2 cups unbleached white flour
1 1/2 cup whole wheat flour
Optional: seeds scraped from one vanilla bean

My Free-Form Filling

2-4 tablespoons coconut oil
2-4 tablespoons maple syrup
2 teaspoons ground cinnamon
1/4-1/2 cup chopped walnuts

Bring milk to a boil in a small saucepan. When it reaches a boil, turn off heat and add potato, butter, and maple syrup.
Next, combine yeast and warm water in a medium bowl. Stir to dissolve.
Add the potato mixture to the yeast and water.
Beat in egg, salt, and vanilla bean.
Add 1/2 cup unbleached white flour, mixing well. Then add the remaining white and wheat flour.
Knead until smooth and elastic.
Cover and leave someplace warm to rise until doubled in size (this takes about 1 hour).

Preheat oven to 375 degrees F.
Punch down dough and knead on lightly floured surface. Then let it sit for another 10 minutes.
Roll out to 1/4 inch thickness in an approximately 9×15 in. rectangle-ish shape.
Spread coconut oil over the dough. My coconut oil was soft enough that I could spread it around with my fingers.
Drizzle with maple syrup and spread the syrup around with the back of a spoon
Sprinkle with cinnamon and walnuts.
Roll dough up from the longer side so you have a long roll.
Cut into 1 inch thick slices (or whatever size gives you 16 rolls) and set rolls in a baking dish or two (you can put one in a plastic bag and then in the freezer for later).
Bake 15 minutes or until lightly browned.

I like to top my cinnamon rolls as needed. The engineers got a simple powdered sugar glaze on theirs. I ate some rolls plain and sprinkled others with powdered cinnamon sugar. You could also spread more coconut oil or butter and maple syrup over warm rolls before serving (like pancakes but maybe better).


25 Comments

Filed under other goodies

Naturally sweetened carrot rice pudding bites

wpid-DSC_0873-2011-10-11-18-30.jpg

Those look good, don’t they? Or maybe I’m the only one who thinks prickly little hunks of healthy stuff look appetizing. Humor me.

Grab a carrot, pull that bucket of dates off the top shelf in your pantry (What? You don’t have a huge container of dates in your pantry? Well go get some!) Put those cashews you’ve been munching on for days to good use. I know you have leftover rice or some other grain in your fridge.

This isn’t so much a recipe post as it is a post about creativity. I’ve been thinking a lot about creativity over the past couple days. Training for my new museum internship started this week and learning through creative design is the institutions main focus.

Creativity…design…those are two crucial aspects of blogging as well as more aspects of our life than we probably realize. They have always been intimidating words for me. I’ve never considered myself to be an “artsy” person and in certain circumstances I’ve felt uncomfortable pressure to be “creative”. Design? How could I ever design anything?

So far, what I’ve learned about creativity in my internship is more relevant to this blog than I thought it would be. I have fresh motivation and renewed ambition. I cannot wait to see what I can really do with this blog if I let loose and break free of how I think things should be. Let’s just find out where this goes.

What does this have to do with carrot rice pudding bites? Carrot rice pudding bites are what happens when I let myself get creative with food. I have some kind of craving for a particular taste, flavor, shape, or texture. I have certain ingredients at my disposal. I really, really want to use something because it’s been in the fridge for bordering-on too long. I look at some recipes – thumbing through cookbooks and clicking through bookmarks online. In the end, I get pull out some ingredients, mash them together in a bowl, smoosh them into a mini-muffin tin, and bake them.

wpid-DSC_0874-2011-10-11-18-30.jpg

How do they taste? Pretty good for being a total experiment in culinary creativity. Did Lee and I eat all of these tasty bites? You betcha – every last sticky-sweet little bite.

Unfortunately, I have not quite mastered the practice of writing down what I’m doing when I’m experimenting in the kitchen. Thus, I don’t have a recipe. That said, I think wads/bites/hunks/balls like this are best made as free-form, creative, recipe-free items. Here are the basic components and a method that seemed to work for me at least once.

Naturally Sweetened Carrot Rice Pudding Bites

dates: 10 small pitted
cashews: 1/2 cup, raw

Chop these up in a food processor. Pour this mix into a bowl and add the rest of the ingredients.

carrot: 1 medium, grated
cooked brown rice: maybe 1 1/2 – 2 cups
spices: allspice, cinnamon, nutmeg, cloves, ginger…you know, those yummy ones…as much or as little of them as you like
flour, whatever kind you want (I used millet flour): 2 tablespoons
egg, beaten: 1 (or make it vegan with 2 tbsp flaxseed meal + 1/4 cup water)

scoop “dough” into a lightly oiled mini muffin pan or onto a cookie sheet (also lightly oiled or lined with parchment/Silpat)
Bake at 375 F. for 10-12 minutes, or until muffins/balls are firm and starting to brown.

Munch away! These are surprisingly sweet for containing no processed sugar.

4 Comments

Filed under muffins, other goodies