Category Archives: other goodies

Chewy granola bars

When life gives you smashed bananas, bake something!

wpid-CIMG2649-2010-11-12-08-29.jpg

That’s my new favorite saying and these are my new favorite thing to make with smashed bananas. In June, when I was hit by a car on my bike in Annapolis, MD, I made banana bread with the battered bananas that had been in my backpack. This is probably the easiest way to produce baking-worthy bananas around here, since I eat them up faster than they can ripen.
This time the beautiful bunch of perfect fruit I bought at Trader Joe’s in Manhattan went for quite a ride in our latest sailing disaster. By the way, I was so excited to find my favorite store blocks from where we were moored. I stocked up all my usual TJ’s fare. The sailing disaster was the scariest experience of my life so far. I’ll give the short version here but the full account is on my other blog, Pirat.
It was 6pm, very dark, and Lee and I were finishing our dinner in the cockpit. I looked over my shoulder to see a breaking wave about to hit our boat. Chaos ensued. We had come upon an uncharted shoal off the coast of New Jersey (Who knew New Jersey could be so treacherous!). Several walls of whitewater knocked our boat on it’s side and the keel (heavy thing on bottom of boat) thunked against the bottom a couple of times. I thought we were going to be smashed to bits and have to be rescued. We made it off, though, and pulled into Atlantic City, where we’d been heading in the first place, within a couple of hours.
Among the things to go flying down below was the bunch of bananas. I think Lee stepped on them while they were on the floor. I just stepped in the remains of my sweet potato from dinner. Yum.

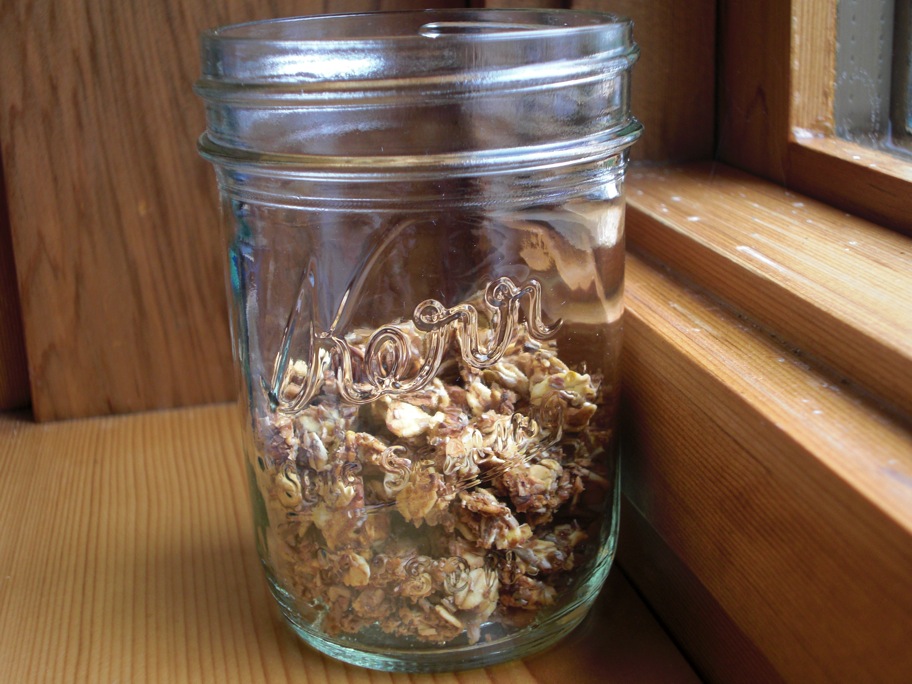
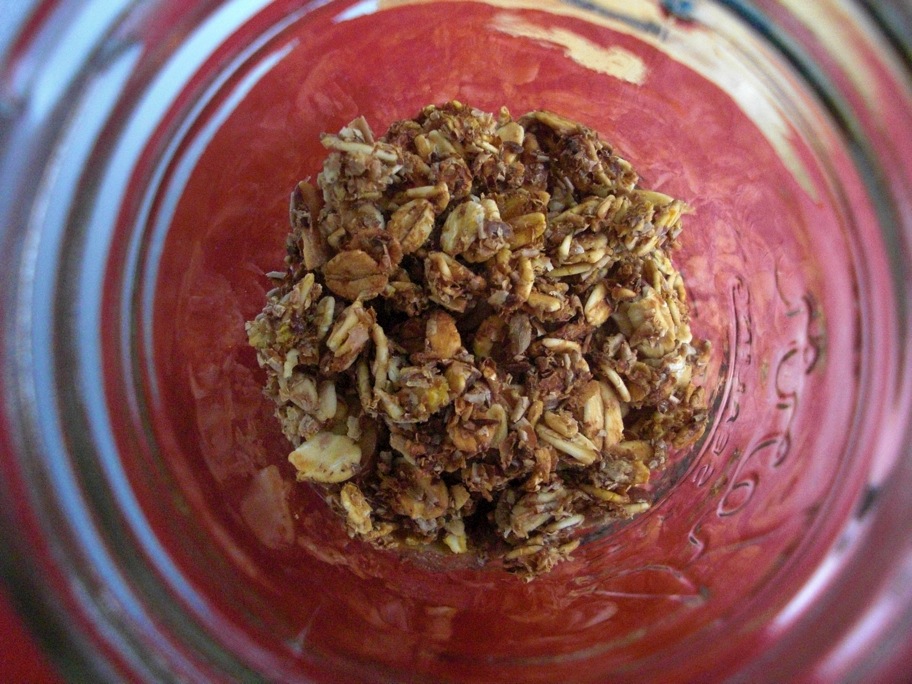
On to the baking! These granola bars were next on my list of things to make anyway so I was actually kind of excited to have all the ingredients ready. It was very satisfying and therapeutic to whip up a sweet treat during our recover day.
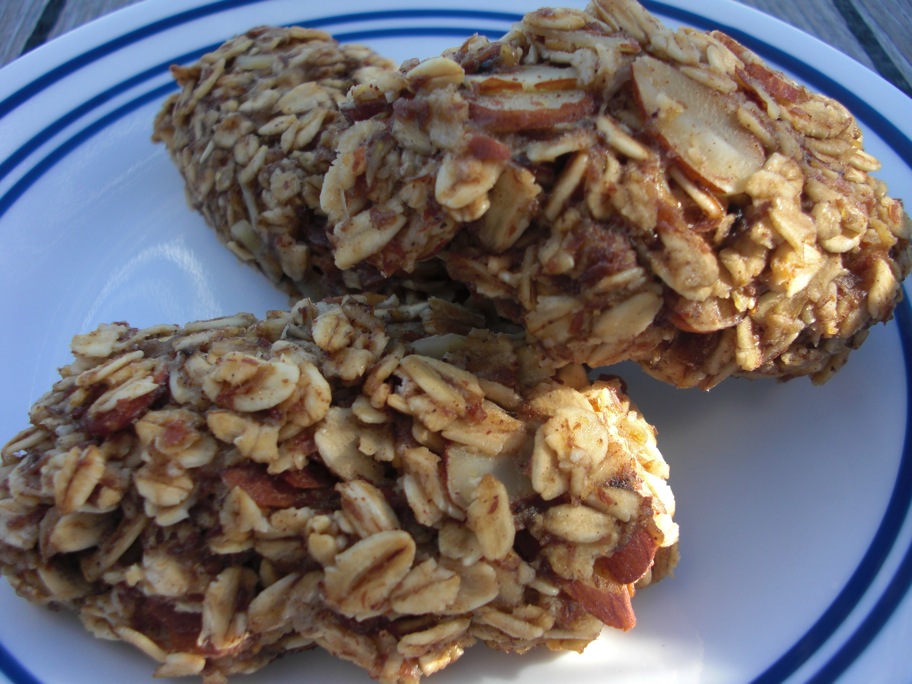
I based my bars on quite a few granola bar recipes from all over the place. As with granola, finding the perfect recipe seemed impossible. I’m too picky about what goes into a good granola bar. I did like the idea of using mashed bananas and they made the end product fabulously soft and chewy. After enjoying the tasty combination of banana and coconut oil in my Banana Bran Scones, I opted to use coconut oil in the granola bars as well. It’s flavor is much stronger than in the scones and I love the banana-coconut fragrance these gave off when baking.
Nut and fruit additions are totally customizable. I used slivered almonds and no dried fruit but I think chopped dates and walnuts or pecans would be delicious. I may try toasting the nuts for more flavor next time and adding a little vanilla or almond exratact.

wpid-CIMG2644-2010-11-12-08-29.jpg

Featured on Baking is Hot

Chewy Granola Bars
Makes about 12 bars

Dry Ingredients
2 3/4 cup rolled oats
1/3 cup flaxseed meal
1/2 teaspoon cinnamon
1/4 teaspoon nutmeg
1/4 teaspoon allspice
Wet ingredients
1/4 cup coconut oil
1/4 cup agave syrup or honey
2 soft bananas
1 egg (or egg replacer equivalent for vegan version)
Additions
1/2 cup slivered almonds
optional: 1/4 – 1/2 cup dried fruit

Preheat oven to 350 degrees F.
Combine dry ingredients in a bowl and set aside.
Melt coconut oil in a medium-sized saucepan over very low heat.
When it is completely liquified, add bananas and mash them thoroughly.
Add agave and egg and beat well till everything is combined.
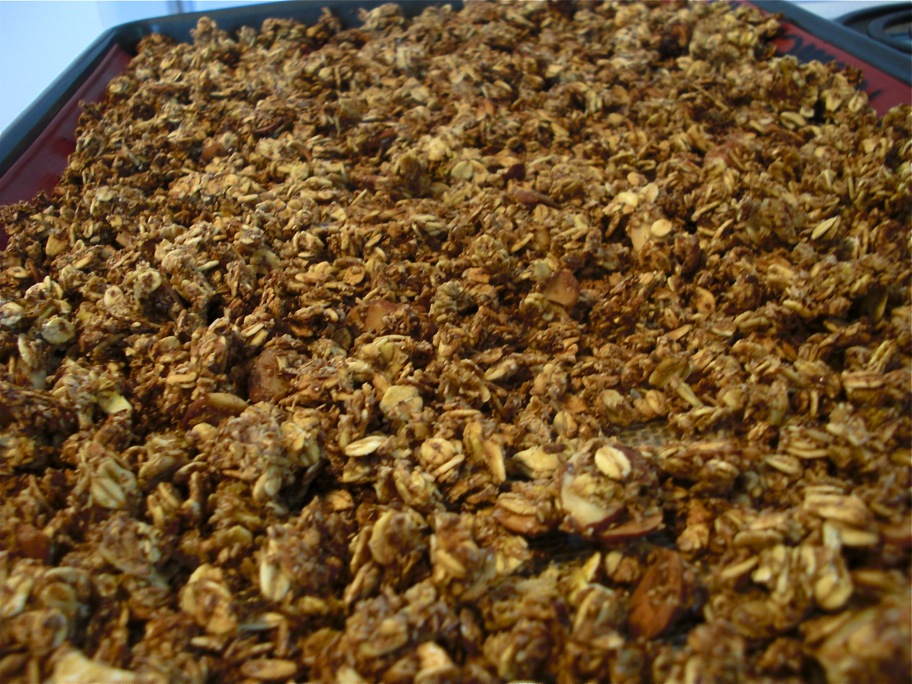
Pour the oatmeal mix into the saucepan with the wet ingredients, stir everything up, and add the nuts and fruit (if using).

Time to get messy!
Scoop about 1/4 – 1/3 cup of the mixture into your hands. Shape it into an oblong bar (I found cupping my palms together worked well) and place it on cookie sheet with a non-stick baking surface (silicone mat or parchment).
I got 13 bars of about the same size out of my mixture but you can make them as big or small as you want. They also don’t have to be bar-shaped – make them round and they look like cookies! I do think shaping them rather than spreading the whole mixture in a pan and cutting it after baking is a good idea. The bars seem crumbly but they firm up nicely.
Bake for 15 minutes at 350.
Place on a wire rack to cool, and try a bar right out of the oven. Yum!

8 Comments

Filed under other goodies

Boat bread

wpid-CIMG2545-2010-11-4-13-51.jpg

        Baking bread was always something I intended to do on the boat. Lee likes rolls. I like sliced wheat. Between us we go through a lot of bread! It’s something I always need when we’re making grocery runs on our bikes to restock on perishables. A grocery store almost always comes along right when I need it, though, so I haven’t been forced to make my own bread. Yesterday I finally ran out of bread with a day or more left till we might be able to go shopping. Apprehensive but determined, I broke out a loaf pan and got to work!
        First question: which recipe? I settled on one from The Country Kitchen with the appeal of simplicity and relative speed. It only calls for one rise, which the author admits won’t make the fluffiest loaf. There is a fair amount of kneading involved, which doesn’t bother me since I have nice, strong, sailor arms.
        Second question: cold oven? Hot oven? I considered starting my bread in a cold oven, since a serious round-the-world sailing cook vouches for that technique in her books. However, I checked a few other cookbooks and decided it was wort the extra propane to preheat the oven. I also used my trusty oven thermometer, just in case!
        My bread rose on the galley floor next to the engine compartment for a while, then in the back of a cupboard on the sunny side of the boat, where things often get really warm. We were just motoring down Long Island sound on a windless day so the conditions were perfect for baking. I discovered that standing part way down the ladder that goes below, with a cutting board on deck in front of me was a perfect place for kneading!

wpid-CIMG2540-2010-11-4-13-51.jpg

        I followed the instructions precisely, using my new food scale, making sure the water was the proper temperature, and halving the recipe with precise calculations. I mixed, kneaded, shaped, waited patiently for the dough to rise, preheated the oven, and monitored the baking bread closely. In the end, my first ever loaf of basic bread wasn’t half bad! It didn’t rise as much as I would have liked but it’s hearty and it tastes wonderful. Sampling pieces of warm homemade bread cheered up the long day on the water.

wpid-CIMG2546-2010-11-4-13-51.jpg

Daily Bread
From The Country Kitchen by Jocasta Ines
Makes two loaves (I made half the recipe for 1 loaf)

1 kg (2 lb) wholemeal flour
450 g (1 lb) strong white bread flour*
1 level tablespoon salt
25 g (1 oz) dried yeast
900 ml (1 1/2 pints) warm water
1 tablespoon sugar or honey

*I didn’t have bread flour so I used all-purpose flour plus 4 teaspoons vital wheat gluten (for 1 loaf).

Mix the flours and salt together in a large bowl and put to warm slightly (I left mine at room temp.)
Dissolve the honey or sugar in half the warm water and add the yeast.
Allow 10 minutes or so for the yeast to become frothy.
Add the yeast to the flour, mixing while adding the rest of the water a little at a time until the dough forms a lump and doesn’t stick to the sides of the bowl.
Knead on a floured board or table for at least 15 minutes.
Shape dough into two loaves and place in greased loaf pans or on a baking sheet.
Cover loaves with a towel or (or place in a bag, as the recipe suggests) and leave to rise for 45 minutes in a warm place or 2-3 hours at room temperature.
Preheat the oven to 425 F.
When the loaves have doubled in size put them in the oven for 10 minutes, then turn the oven temperature down to 375 F and cook for another 30 to 50 minutes.
Remove the loaves from their pans and allow them to cool before storing (this doesn’t mean you can’t slice yourself a piece while the bread it warm!).

6 Comments

Filed under other goodies

Not so sweet but nice and crunchy granola

wpid-cimg2330-2010-10-15-13-07.jpg

wpid-cimg2336-2010-10-15-13-07.jpg

        I’ve been on the hunt for a good granola recipe for a long time. Maybe it would be more accurate to say I’ve been looking for the right granola recipe for a long time. There are tons of really good ones out there but I am looking for something very specific in my granola. Of course it needs to be healthful and tasty. I prefer it to be made with the most basic, whole ingredients (homemade granola made with store-bought cereal makes very little sense to me). Nuts are good, but not too many. I’d consider dried fruit but I always add fresh fruit to my cereal when I eat it anyway. Finally, too much oil and sugar moves granola from a healthy breakfast or snack into the realm of candy.
        With all the granola recipes I’ve been wanting to make filed away for reference, I set out to come up with my own mix this morning. I was inspired by Steph Chows Mixed Berry Sucanat Granola to use applesauce as a replacement for oil. Now what about the sugar? My favorite brand of granola, Nature’s Path Hemp Plus, is hardly sweet at all. It’s lumpy, crunchy, light, and very satisfying. This morning I threw a few things in a bowl to try to recreate those characteristics. I was also just trying to use up the dregs of various ingredients in my pantry.

wpid-cimg2338-2010-10-15-13-07.jpg

Not So Sweet Granola

2 cups thick cut rolled oats
1/2 cup quick-cooking oats
2 cups wheat bran
1/4 cup flax seed meal
1/4 cup slivered almonds – or more if you’re more nutty than I am!
1/2 teaspoon cinnamon
*1 cup applesauce
optional sweetener: 1/3 cup sucanat, maple syrup, agave, or honey

Preheat oven to 325 degrees F.

Mix all the dry ingredients together in a large bowl.
Add the applesauce and optional sweetener.
Mix until all dry ingredients are coated.
Spread evenly on a cookie sheet lightly coated with oil or lined with parchment/a silicone mat. (It helps if the cookie sheet has rims around the edge so the granola doesn’t go sliding off.)
Bake at 325 for about 45 minutes, checking and stirring things around a couple times during baking.
Cool completely on the cookie sheet and then store in an airtight container, adding dried fruit at this point if you’d like.

*I used one small container of unsweetened applesauce and one of sweetened cinnamon applesauce because that’s what I had left.

wpid-cimg2324_2-2010-10-15-13-07.jpg

        For this batch (lets call it Granola #1) I didn’t use any sweetener. I wanted to see what granola made with just applesauce would taste like and if it would even work. Well, it worked and it tastes great! It’s not sweet at all but it tastes pleasantly nutty from the flax and almonds and it’s very crunchy. The applesauce holds everything together nicely. So far I’ve just snacked on Granola #1 plain but I’m looking forward to trying it with some vanilla greek yogurt and a banana tomorrow morning! Next time I’ll try adding some maple syrup to see how that compares.

7 Comments

Filed under other goodies

Buckwheat English Muffins

wpid-cimg2272-2010-10-10-12-48.jpg

wpid-cimg2275-2010-10-10-12-48.jpg

Again with the English muffins. I couldn’t help myself. The first batch was just so good I couldn’t help but try them again! I guess once you’ve gone homemade store bought just doesn’t cut it.
This time I opened my new bag of buckwheat flour, a new flour for me. This particular brand is produced in Maine and had some intriguing recipes on the bag (I’m saving those for later!). Never having worked with buckwheat flour before, I was surprised by the texture. It’s not…floury. It’s a yellowish color and has a sandy texture. The dough I mixed up last night was much drier than the whole wheat version and I was worried about it drying out or not rising overnight. It came out fine though. The dough surface was a little dry this morning but it had risen. It revived when I added the rest of the ingredients and popped it in a warm oven to rise again.

Things I did differently from the first time: I cut the muffins larger. They seem to shrink in circumference when they cook so make them on the big side. Last time they were almost too small for an egg! Cutting the muffins bigger meant I made less of them (11 total). I didn’t burn the first batch in the skillet this time! I made a totally new mistake! I didn’t have the cornmeal out when I was cutting out the circles so I figured I’d just put it in the skillet when I started cooking. Bad idea. First of all, the muffins stuck to the baking sheet I put them on to rise. They needed the cornmeal so they wouldn’t glue themselves down! Second, the cornmeal I put in the hot skillet right before adding my sticky muffins burned after a few minutes. It didn’t really stick to the muffins either. Oh well. I cleaned out the skillet and dusted the sticky side of the remaining muffins before cooking them.

wpid-cimg2263-2010-10-10-12-48.jpg

Once again, these came out slightly sour, crunchy on the outside and holey on the inside. The buckwheat worked well except it made the muffins kind of yellow. I was so starving I snatched a muffin from the first batch out of the skillet, buttered it up, and gobbled it while it was nice and hot!

I decided to submit these to YeastSpotting, which I just discovered the other day. What a treasure trove of bread!

wpid-cimg2271-2010-10-10-12-48.jpg

Buckwheat English Muffins
From Laurel’s Kitchen by Laurel Robertson, Carol Flinders, and Bronwen Godfrey

1 tablespoon active dry yeast
1/2 cup warm water
1/2 cup plain yogurt (I used nonfat greek yogurt)
1/2 cup boiling water
1 teaspoon salt
1 cup buckwheat flour
2 or more cups all-purpose flour (I used about 2 1/2 total with flour for kneading)
1/4 cup fine cornmeal
1/2 teaspoon baking soda

Dissolve yeast in warm water.
Mix yogurt and boiling water in a large bowl. Stir in the yeast mixture, then 1 cup all-purpose flour and 1 cup buckwheat flour.
Cover the bowl with a towel and it this sit in a warm place until the dough doubles in bulk, or leave it overnight (I left mine on the counter overnight). The dough is spongy and will get more sour the longer it sits.
After the dough has doubled in bulk (40-60 min. or overnight), mix in the remaining flour along with the salt and soda. Knead vigorously, adding more flour as needed until you have pliable but slightly sticky dough. Return the dough to the bowl, cover it, and let it rise for a second time (30 min. or more).
Punch the dough down and turn it onto a floured surface. Roll it out to half-inch thickness with a floured rolling pin. Cut it into circles with a four-inch cookie cutter of the end of a one-pound coffee can (my dough made 12 muffins).
Dust both side of the muffins with cornmeal and set on cookie sheets to rise until doubled in bulk (45 min. to an hour or more if the dough is cold).
*Cook on a griddle or skillet at medium-high heat for 3-5 minutes on each side.
Split with a fork, the traditional way, and spread on something yummy!

*I used a cast iron skillet and cooked 3 muffins at a time this time. I used low heat after initially heating the skillet. Watch the muffins carefully as they tend to burn. The cornmeal and seasoned skillet made oil unnecessary. The muffins puff up as they cook so they’re kinda fun to watch.

10 Comments

Filed under other goodies