Monthly Archives: December 2011

We’ll see

wpid-DSC_0297-2011-12-15-11-02.jpg

Meet our Christmas tree. This is our first real, live Christmas tree as a married couple with a home. Actually, it’s our first ever. This is probably going to be the most normal, stationary, settled Christms Lee and I have experienced since we met. We always seem to be on our way someplace, in the middle of something, or at least away somewhere. This year, we’re home.

wpid-DSC_0291-2011-12-15-11-02.jpg

That’s not to say crazy stuff isn’t going on in these pre-Christmas weeks. First, Lee’s parents visited for a long weekend. It was a busy and excited few days as we showed them our new city, visited my parental unit in Napa, and took advantage of the extra hands to work on our house. The old, crummy chimney came out and a new one will replace it soon. Half of a mini-split heat pump is now on our roof, looking like a space ship that landed on an alien planet. We have a new coffee table – that I looooove – thanks to The Parents (yay!).

Meanwhile, I have applied for a job at the museum where I’ve been interning for two eventful months. It goes without saying that I really, really, really want this job. I wish they could hire many more of us interns so we could keep up our great teamwork. The waiting-to-find-out process os so painful.

What else? Food has been important this month. I’ve done a lot of baking, some of which has not made it to the blog. I’m still perfecting the family ginger cookie recipe so those aren’t ready to post yet. The bran muffins I made on Monday, however, were awesome. I deviated from my usual favorite bran muffin recipe and was pleasantly surprised to find that I could sweeten a muffin with only blackstrap molasses and be completely satisfied.

Our meals with Lee’s parents were all delicious but rich. A weekend of eating out is kind of overwhelming for me when I’m so used to cooking at home 99% of the time. We ate at some incredible restaurants, including The Boon Fly Cafe and Cindy’s Backstreet Kitchen in Napa and St. Helena.

The plan for this coming weekend is to drive to Oregon to pick up my dog (yay!). Nothing ever goes as planned, though, and everything this week went out the window when a little crisis struck. I’m flying to southern California today for this reason but should be back Friday night so Lee and I can leave for Oregon on Saturday.

wpid-DSC_0298-2011-12-15-11-02.jpg

I just want the week to be over so I can relax at home with my husband, dog, and Christmas tree and do lots of cooking! We’ll see how that goes.

5 Comments

Filed under inspiration and musings

Cherry-Filled Sourdough

wpid-DSC_0287-2011-12-7-13-28.jpg

        I have a lot of food boundaries. Some of them are more like barriers (I think this term has a slightly negative connotation) and some are lines that I think it’s better not to cross. I spend a lit of time breaking down the barriers and testing the boundaries of my cooking and eating habits. Comparing now to my eating disordered past, I think I only have my big toe dipped in the food restriction waters, while I was up to my neck several years ago.
        Still, old barriers remain and I chip away at them every day. Take cheese, for example. I used to eat the most processed, light, fat-free, bleugh cheese ever, and then only in minuscule amounts. Right now, I have exactly 5 kinds of cheese in my refrigerator…wait, make that 4. I finished the feta for lunch today. I love cheese and I’ve learned to eat real-food kind of cheeses (no more nasty processed stuff) in reasonable amounts.
        I could go on but I think one confession is enough for one post. Oh, but then there’s the whole reason I started talking about boundaries/barriers in the first place: Pie filling! You know the stuff in the can that you can just pour into a crust and voila, you have a pie? I don’t think I had ever bought or baked with canned pie filling until Duncan Hines sent me coupons for their baking mixes as well as Comstock Wilderness Fruit Fillings through the Foodbuzz Tastemaker program last month.
        Canned pie filling was on the other side of pretty much every food boundary I have. First and foremost it’s a non-homemade route for baking, which I try to avoid. Second, it’s got to be loaded with high-fructose corn syrup and probably doesn’t have much real fruit in it anyway. Third, fruit pies aren’t my favorite. I’m a pumpkin girl all the way.
        As soon as I brought myself to pie filling level in front of the supermarket shelves (on the floor), Comstock surprised me. Some of the cans looked newer and were labeled “More Fruit” and “No high-fructose corn syrup”. What? Really? Huh, maybe this stuff isn’t that bad after all.
        I chose a can of Cherry “More Fruit” filling and immediately started thinking of how I was going to use it. Pie was too obvious. I wanted to make bread, sourdough bread to be specific. It struck me that the sweet, gooey fruit filling would be a perfectly odd partner for tangy, dense sourdough. Thus, the cherry-filled sourdough loaf was born!

wpid-DSC_0277-2011-12-7-13-28.jpg

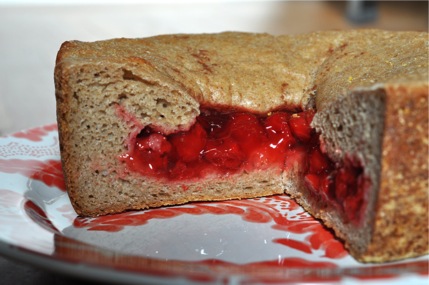
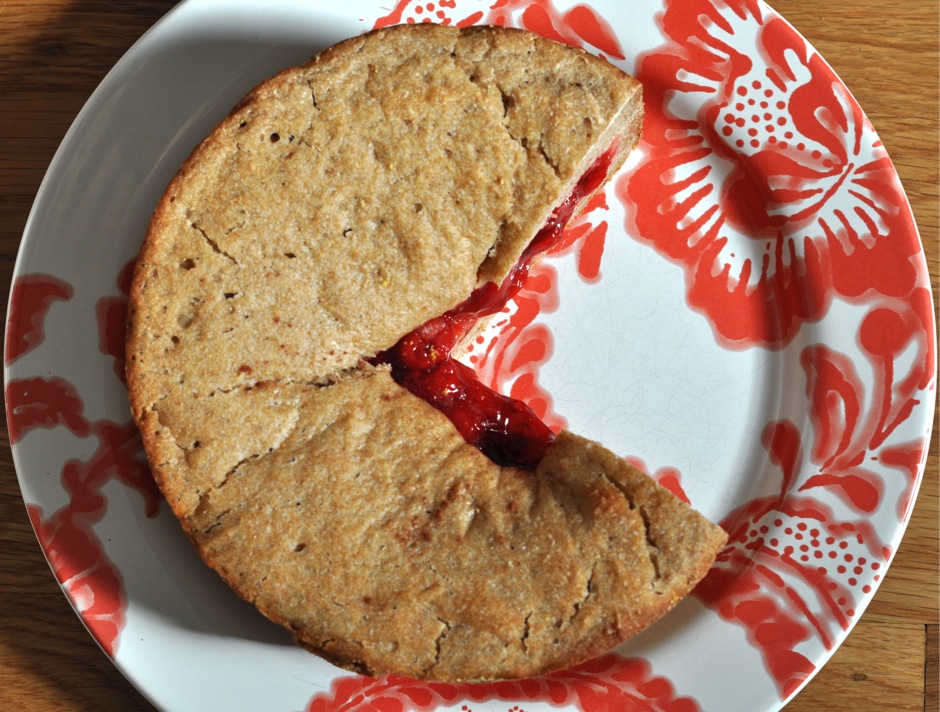
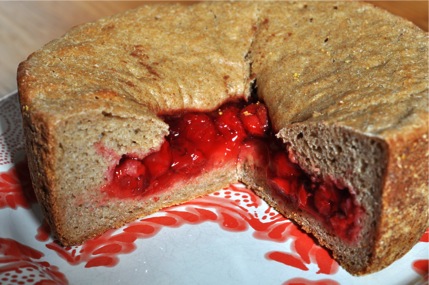
        It may look like a cherry pie collided with a loaf of bread to produce this bizarre offspring. I like to imagine both things flying through the air in my kitchen…but that would be messy. Instead, I simply made a small batch of wet dough with my sourdough starter, layered half of it on the bottom of a round baking dish, poured in about half the can of fruit filling, and then made a ring around the edge of the filling with the remaining dough. After some more rising and some oven time, I had a sweet, doughy thing that I didn’t know how to eat. Fork? Hands? Hands won but it was messy.
        The sourdough is very sour (I used a lot of starter) and the cherries are very sweet. Together, though, they are the perfect winter breakfast or brunch flavors. One reason I chose the cherry filling was that cherries are no longer in season so I can’t actually make a cherry pie from scratch right now. That’s the perfect excuse for using a canned convenience food, in my opinion. Cherry pie filling is such a Christmasy color that it’s nice to have it around this time of year, even if it isn’t made from seasonal produce.
This isn’t really a recipe, since I totally improvised the sourdough bread and I think everyone who makes sourdough has their own way of doing it. If you have a starter, make a whole grain dough with a high moisture content and open a can of pie filling. If you don’t have a starter, put it on your Christmas list!

wpid-DSC_0280-2011-12-7-13-28.jpg

Hearty Cherry-Filled Sourdough Bread

1 batch of your favorite sourdough, made with a little less flour or more water so it’s wet enough to spread over the bottom of a pan.
1 can Comstock Wilderness Fruit Filling (More Fruit, no high fructose corn syrup!)

Prepare dough, allow it to rise once. Punch down.
Coat the inside of a baking dish with oil and then stone-ground cornmeal, semolina flour, or regular flour.
Divide dough in half and gently spread half of it over the bottom of the baking dish.
Spoon about half of the can into the center of the dough in the dish, leaving at least an inch of dough around the edge of the filling.
Lay the rest of the dough all the way around the edge of the filling so that it makes kind of a barricade between the fruit and the sides of the baking dish.
Cover dish and allow bread to rise for another couple of hours, or until the top dough circle has expanded to almost cover the filling underneath.
Preaheat oven to 425 degrees F. Bake bread for 25-30 minutes, or until it’s golden-brown on top and the edges have pulled away from the dish somewhat.
Cool on a wire rack until the dish is no longer hot to the touch, and the fruit filling is somewhat set (not too liquidy). Then remove loaf from dish and continue to cool on rack.
Slice like a pie and serve!

The only thing that would have made this better is chocolate. Why didn’t I think to add chocolate? You could always spread some Nutella on each slice or sprinkle dark chocolate chips onto the bottom dough layer before adding the cherries. Now that would be decadent!

4 Comments

Filed under Bread

Toll Houses

wpid-DSC_0253-2011-12-4-15-54.jpg

This month’s Recipe Swap recipe made me smile. It also appealed to my nerdyness with a little geographical and historical context lesson. Christianna at Burwell General Store decided to start the swaps second year with a new cookbook. A group of brave bloggers received this vintage recipe from a very unique cookbook:

wpid-recipeswap_ford_bookcover-2011-12-4-15-54.jpg

wpid-recipeswap_tollhouse-2011-12-4-15-54.jpg

        I didn’t do a ton of baking as a kid but I do remember making Toll House chocolate chip cookies with my mom. I know they were Toll House because I remember reading the recipe off of the yellow bag. Though it didn’t happen often, for me cookie baking meant valuable lessons in how to use the stand mixer. It was big, heavy, more than a little scary with all those moving parts, and absolutely essential for perfect cookies.

Until very recently, I didn’t have a mixer of my own. My grandmother’s KitchenAid coming to live with me just happened to correspond with this cookie recipe swap. Creaming butter and sugar has never been so satisfying!
Oh but wait, I didn’t use butter in my Toll House cookies. There are two explanations for this:

  1. I wanted to use a “healthier” fat and just experiment with a different version of the traditional cookie.
  2. I forgot to buy butter.

I’d say the real reason is some combination of the above…but mostly number 2. Butter was on the grocery list. I meant to use it, really I did. I’m just not a big butter user so it didn’t make it into my basket. No problem. I had coconut oil! Since it’s solid at room temperature and has such a lovely flavor, I sometimes substitute coconut oil for butter in my baking. While it’s not the same as something made with butter, I think the flavor and texture of these cookies is outstanding.

wpid-DSC_0246-2011-12-4-15-54.jpg

        Now comes the part where I explain the houses. You see, my husband is such a sweet guy, he randomly buys me cookie cutters (this just started recently). Last month he added a house-shaped cutter to my small collection. That, of course, made me smile because we were about to buy our first house! We moved in a week or so ago so I’m feeling very homey and grounded nowadays. The house cookie cutter came out as my play on Toll House cookies and to share a little of my new home love with everyone.

I changed a few other things besides the shape and fat in my cookies. I used white chocolate chips in place of regular, vanilla bean instead of vanilla extract, and whole wheat pastry flour instead of all-purpose. This recipe is small – a nice size for a cookie recipe (unless it’s Christmas and you’re trying to feed lots of people). I baked all the dough in a pyrex dish lined with parchment and then cut the houses out of the giant sheet cookie. This worked pretty well but only made 5 houses + trimmings. The house cookies are big. I’d share one with 1 or 2 other people. The trimmings are perfect for snacking on while you’re snapping your cookie pictures or for crumbling over ice cream…yum!

wpid-DSC_0248-2011-12-4-15-54.jpg


Toll House Houses
Adapted from The Second Ford Treasury of Favorite Recipes from Famous Eating Places

1/2 cup coconut oil
6 tablespoons brown sugar
6 tablespoons granulated sugar
1 egg, beaten
1/2 teaspoon baking soda
1/2 teaspoon hot water
1 1/8 cup flour, sifted (I used whole wheat pastry)
1/2 teaspoon salt
1/2 cup nuts, chopped (I used walnuts and pecans)
1/2 cup white chocolate morsels
1 teaspoon vanilla (I used the seeds scraped from 1 vanilla bean)
Cranberries would have been a good addition. Add some if you want! They’ll be pretty!

Preheat oven to 375 degrees F.
In the bowl of a stand mixer, cream together coconut oil and sugar.
Add egg and vanilla bean scrapings.
Dissolve baking soda in hot water and then add to batter.
Sift flour and salt together and add to mixer a little at a time until completely incorporated.
Stir in nuts and chocolate morsels.
Line a baking dish (mine is 11×7 in. but a bigger one would be better) with parchment paper.
Spread cookie dough over paper to cover the bottom of the dish. The dough will be relatively soft so this is actually pretty easy.
Bake at 375 for 15-20 minutes or until golden brown.
Remove from oven and let cool. You can lift the “cookie” out of the dish and onto a wire rack using the parchment paper.
Once the cookie is cooled, cut out house shapes in as efficient a pattern as possible.
Start looking for a giant milk moat for your houses!

16 Comments

Filed under desserts