Author Archives: Rachel

Whole Wheat English Muffins

wpid-cimg2172-2010-09-27-20-09.jpg

wpid-cimg2177-2010-09-27-20-09.jpg

        I won’t hide it. I’m so proud of myself for making english muffins! They have been on my list of must-bakes for a while now and I finally mustered the guts to try last night. I had all the ingredients, not that it’s a long list, and I was mentally prepared for a two day process with several risings. Now that I’m done, they really weren’t that hard to make. That’s a good thing, since I hope to be making them on a regular basis from now on!
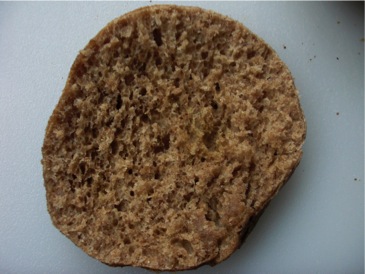
        There are english muffin people and there are toast people. I have always been an english muffin person. I love how spreads liquify and trickle into the little orifices on hot, split muffins. I love their crusty exterior and spongy core. I love splitting them with forks and covering them with peanut butter. My mom is an english muffin person too. She has a very precise method for perfectly toasting them in her toaster oven. She is going to have to try making her own, since I now know they really are infinitely better than the store bought kind.
        Something gives these muffins an unusual tangy flavor. Maybe it’s the overnight rise and the yogurt as the recipe suggests. Whatever it is, they don’t just taste like bread shaped like an english muffin. They taste very homemade and wholesome!

wpid-cimg2176-2010-09-27-20-09.jpg

English Muffins
From Laurel’s Kitchen by Laurel Robertson, Carol Flinders, and Bronwen Godfrey

1 tablespoon active dry yeast
1/2 cup warm water
1/2 cup yogurt (I used plain kefir)
1/2 cup boiling water
1 teaspoon salt
3 or more cups whole wheat flour (I used about 3 1/2 total with flour for kneading)
1/2 cup fine cornmeal
1/2 teaspoon baking soda

Dissolve yeast in warm water.
Mix yogurt and boiling water in a large bowl. Stir in the yeast mixture, then 2 cups of flour.
Cover the bowl with a towel and it this sit in a warm place until the dough doubles in bulk, or leave it overnight (I left mine on the counter overnight). The dough is spongy and will get more sour the longer it sits.
After the dough has doubled in bulk (40-60 min. or overnight), mix in the remaining flour along with the salt and soda. Knead vigorously, adding more flour as needed until you have pliable but slightly sticky dough. Return the dough to the bowl, cover it, and let it rise for a second time (30 min. or more).
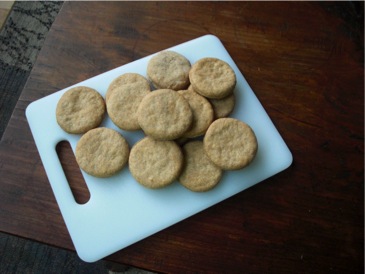
Punch the dough down and turn it onto a floured surface. Roll it out to half-inch thickness with a floured rolling pin. Cut it into circles with a four-inch cookie cutter of the end of a one-pound coffee can (my dough made 12 muffins).
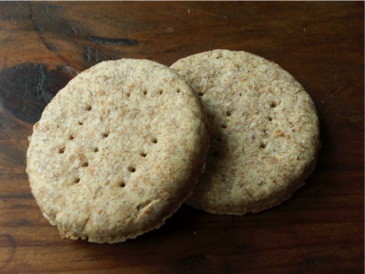
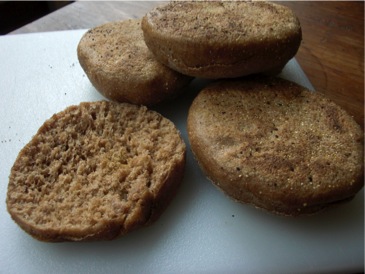
Dust both side of the muffins with cornmeal and set on cookie sheets to rise until doubled in bulk (45 min. to an hour or more if the dough is cold).
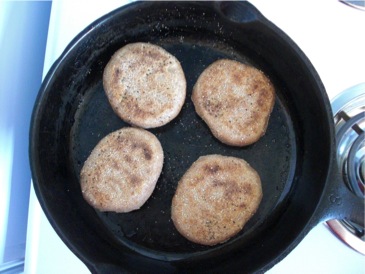
*Cook on a griddle or skillet at medium-high heat for 10 minutes on each side.
Split with a fork, the traditional way, and spread on something yummy!

*I used a cast iron skillet and cooked 4 muffins at a time. I ended up using rather low heat after burning the first batch. It didn’t take a full 10 minutes for each side so watch them carefully. The cornmeal and seasoned skillet made oil unnecessary. The muffins puff up as they cook so they’re kinda fun to watch.

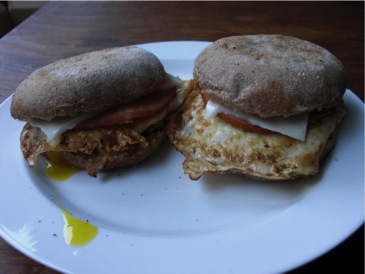
        After cooking all 12 muffins, I whipped up a couple of egg sandwiches for Lee for lunch. That’s what happens when you spend all morning baking! Breakfast foods end up as lunch. Lee loved the homemade muffin sandwiches and gave them the “special treat” designation reserved for his favorite foods. I nibbled the unburned halves of the burned batch all afternoon.

wpid-cimg2180-2010-09-27-20-09.jpg

2 Comments

Filed under egg sandwiches

Speltalicious spelt biscuits

wpid-cimg2154-2010-09-26-12-13.jpg
Spelt biscuits – look at all that texture!
wpid-cimg2151-2010-09-26-12-13.jpg
Wheat/white version – they taste better than they look!

I wasn’t going to post about the biscuits I made the other day but they’ve proven to be such tasty snacks and stew accompaniments that I’m proud to post about them.
Last week I dug this cookbook, The Country Kitchen by Jocasta Innes out of my book box in the basement. I was looking for jam and preserve recipes but I found a lot of other tasty looking things that I’d never thought about making before. The recipes and kitchen wisdom in this book are pretty old fashioned and very British. It is definitely oriented towards homemade staples and living off the earth’s bounty.
A biscuit recipe caught my eye as something that might go well with the stew I was making for dinner. I decided to make two variations: a half white, half wheat flour version and a spelt flour version. I love spelt flour. I love the hearty, nutty flavor and unique texture. The market where I used to shop in Denver, Sunflower Farmers Market, made delicious 100% spelt bread that made heavenly PB and J sandwiches. I really miss that bread.
The spelt biscuits (and by biscuit, I mean crunchy cracker-like English biscuits) were much better than the white/wheat version. The spelt flour’s flaky, crumbly texture combined with just the right amount of butter made for a great consistency. The white/wheat biscuits were good too. They just didn’t look as cool because I forgot to poke fork holes in them (yes, the fork holes are important for the biscuit look). I got to practice my metric conversions for this recipe!

Water Biscuits
From The Country Kitchen by Jocasta Innes

22g (8 oz) flour (I made one batch of half white, half wheat and a second batch using all spelt flour)
1 teaspoon baking powder
a pinch of salt
50g (2 oz) butter
150 ml (1/4) pint water
ground rock or sea salt

Preheat oven to 325 degrees F.
Sift together the flour, baking powder, and salt.
Rub in the butter (I used a pastry blender).
Add just enough water to make a firm dough.
Roll dough out thinly on a lightly floured surface.
Stamp out rounds with a cookie or biscuit cutter (I used the rim of a small cup).
Prick rounds all over with a fork and sprinkle them with sea salt.
*Bake on a lightly greased baking sheet in a 325 degree oven for 20 minutes or until golden and crisp.

*My biscuits took more like 45 minutes to an hour to get really crisp. I may not have rolled my dough out thin enough. I increased the temperature to 400 deg. F for the spelt version and baked them for about 45 minutes. They seemed to crisp up faster than the white/wheat biscuits.

Leave a Comment

Filed under other goodies

Maple almond muffins: a more sophisticated muffin

wpid-cimg2156-2010-09-24-12-03.jpg

        I get excited about almond extract. Pouring teaspoon after teaspoon of vanilla extract gets boring after a while. So, on the rare occasions when I break out the little bottle of almond deliciousness, measure out a spoonful, and smell that fabulous, sweet, nutty aroma…I’m in heaven. These muffins got me excited about almonds, maple syrup, and how fabulous they taste together!
        These maple almond muffins seem like a decadent morning pastry or even a dessert compared to what I usually bake. They include a not-too-sweet batter infused with almond extract and a rich filling made with ground almonds, cinnamon, and lots of maple syrup. The filling creates a layer of crunch and sweetness in the middle of the muffin and bubbles out of the top in occasional mapley spots.
        I could not wait for these to come out of the oven. I tried to distract myself by washing dishes but I kept looking at the clock to see if the time had run out yet. When they were finally done I made Lee have one with me, not that that took a lot of persuasion. We both agree, these are very good. They make me think of elegant brunches and smell so, so wonderful. I think I’ll try to keep the muffin baking smell trapped inside with me all day!
        I actually didn’t change anything about this recipe. Next time I would bake them for a little less time, as they stuck to the wrappers a bit.

wpid-cimg2163-2010-09-24-12-03.jpg

Maple Almond Muffins
From Horn of the Moon Cookbook by Ginny Callan

Muffins
1 1/2 cups whole wheat pastry flour
1 cup whole wheat flour
2 teaspoons baking powder
1/4 teaspoon salt
1 1/4 cups milk
1/4 cup vegetable oil
1/4 cup maple syrup
1/2 teaspoon almond extract
1 egg, beaten

Filling
1/2 cup maple syrup
1/2 cup finely chopped or ground almonds
6 tablespoons whole wheat pastry flour
2 teaspoons cinnamon
2 tablespoons butter, melted

Preheat oven to 400 degrees F.
In a large bowl, mix flours, baking powder, and salt.
In a smaller bowl, combine egg, oil, maple syrup, milk, and almond extract.
For the filling, combine maple syrup, almonds, flour, cinnamon, and butter in a third bowl.
Next, add the liquid muffin ingredients to the dry ingredients.
Line a muffin pan with paper or silicon liners.
Spoon one tablespoon of muffin batter into each cup, followed by one tablespoon of filling.
Finish off with one tablespoon of muffin batter over the filling.
Optional: Sprinkle the top of each muffin with slivered almonds.

Bake at 400 degrees for 15-20 minutes (I would tend towards 15, especially if you have a dark colored muffin pan)

Enjoy with a mid-morning cup of tea!

10 Comments

Filed under muffins

Just your basic egg sandwich

        I’m back from a semi-relaxing week on Block Island. The first thing I did was spend a grotesque amount of time in front of my computer on Monday morning. There wasn’t much in the way of internet access on the island, which was a good thing! Now that I’ve readjusted to mainland society there’s a lot of catching up to do. Fall being back to work/school/reality time, it seems like there are a zillion things that need doing every day. A day full of tasks warrants a good breakfast. For Lee, that means an egg sandwich or two.
        This morning, it was a protein shake and an egg sandwich. There wasn’t anything special about the sandwich, although my standard, stripped-down version does not include bacon. The bread was a bit of a treat: I normally use english muffins but this morning two slices of Borealis Breads Roasted Pepper loaf sent out an amazing aroma from the toaster. Borealis is a Maine bread company that uses Maine-grown grains in their hand shaped loaves baked on a stone hearth. The Roasted Pepper bread is perfectly spicy and smells so good!

wpid-cimg2143-2010-09-22-16-07.jpg

Basic Egg Sandwich

1 or 2 eggs (cage free/organic/fresh from the hen down the road if you can get it!)
2 slices canadian bacon
2 slices hearty bread

When I’m adding bacon to a sandwich I cook the bacon first so the pan has some good flavor going.
When the bacon is browned on both sides, move it off to the side of the skillet and add the egg in the center of the skillet.
Cook the egg briefly on both sides.
Meanwhile, pop the bread in a toaster and toast to your desired amount of toastiness (my dad likes his toast burnt).
When the egg is done, assemble your sandwich! My mom used to cut a slit in the egg and spread the yolk out over it so the whole thing would be gooey and good.

        I love getting creative with what I put on egg sandwiches. There are a few obvious additions like salt and pepper, cheese, salsa, ketchup etc. but I have some ideas for tasty additions that I’ll be trying out very soon. Until then, I’m going to drool over this sandwich, which Lee heartily approved of but I didn’t get to taste (due to the bacon).

Leave a Comment

Filed under egg sandwiches